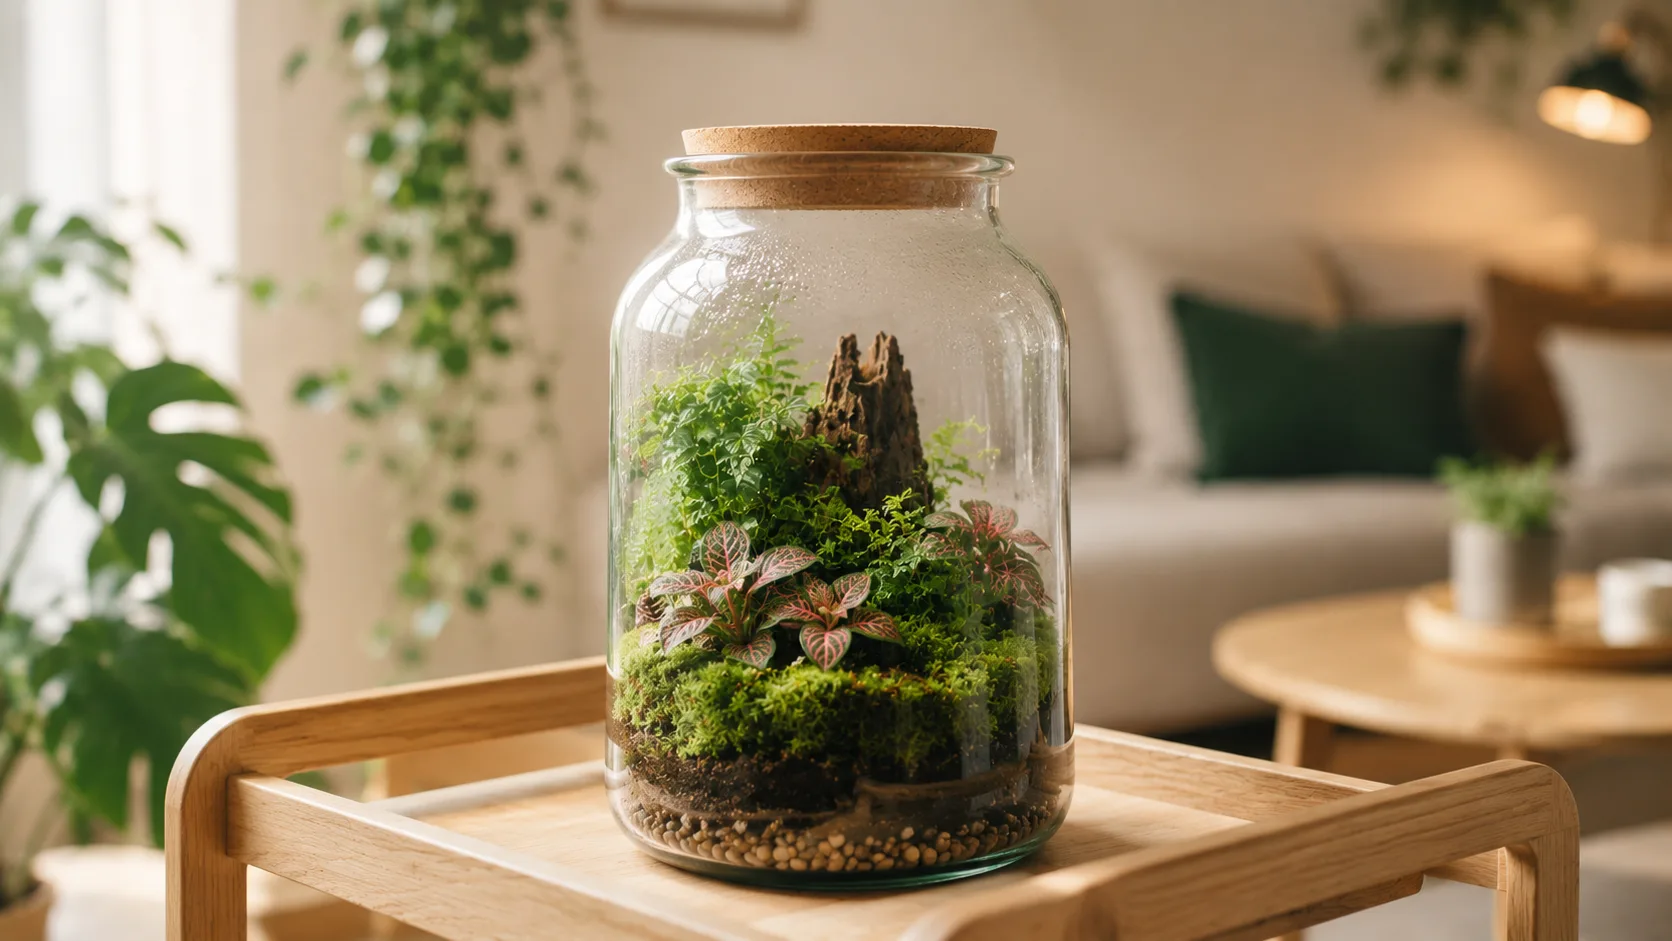
Closed Terrarium: Build a Self-Sustaining Miniature Ecosystem
Complete closed terrarium tutorial: gear, layers, suitable plants, maintenance and mistakes to avoid. Build a self-watering mini ecosystem.
By SPRAIA editorial team · Method: botanical sources, field feedback and editorial validation
A sealed glass jar, a few plants, some moss, a handful of pebbles — and an ecosystem that lives on its own for years, with no watering. The closed terrarium is one of the quiet marvels of indoor botany: a miniature water cycle, contained photosynthesis, a pocket jungle.
The most famous example? David Latimer’s, sealed in 1972 with a single initial watering. Fifty years later, untouched, it’s still alive. In this guide, you’ll understand how this miracle works, build your own step by step, choose the right plants, and avoid classic mistakes.
The principle: a sealed water cycle
A closed terrarium works thanks to a perfectly contained water cycle between glass, plants and substrate.
Three processes in a loop
- Evaporation: water in the substrate evaporates with warmth. Vapour rises towards the top of the jar
- Condensation: vapour meets the cooler glass walls and condenses into droplets that slide back into the substrate
- Photosynthesis + respiration: plants absorb ambient CO2 during the day (photosynthesis, releasing O2) and the reverse at night (respiration). Over time, balance is reached
As long as there’s light (energy), water (in a loop) and a little gas to exchange, the system can run indefinitely. It’s the perfect illustration of a self-sustaining ecosystem.
David Latimer’s story
In 1960, a retired English engineer named David Latimer planted a few Tradescantia cuttings inside a 38-litre demijohn. He added a glass of water, sealed the cap, and placed the jar near a window. He watered it once in 1972 — then never opened it again. More than 50 years later, the terrarium is still alive, photographed and exhibited. Proof that a properly primed water cycle can run indefinitely.
What you need
The container
The choice of container determines your terrarium’s look and longevity.
- Le Parfait-style jar (1 to 5 litres) — the classic, with rubber gasket and mechanical lid. Perfect for starting out
- Decorative sealed vase — demijohn, cloche, sphere. More design-led, sometimes trickier to work inside
- Repurposed aquarium / vivarium — for larger terrariums, with a glass lid
- Minimum height: 15 cm. Below that, air circulation and plant growth are limited
Pick clear, colourless glass. Tinted glass filters too much light and undermines photosynthesis.
Materials for the layers
- Gravel or expanded clay pebbles (drainage) — about 3-4 cm deep
- Activated charcoal (antibacterial, odour filter) — 1 cm — sold at pet shops or aquarium stores
- Geotextile or light landscape fabric — to separate drainage and substrate
- Substrate for tropical plants — light potting soil + a little peat and perlite
- Decor: bark, mini-rocks, moss, mini figurines, driftwood roots
Tools
- Long spoon or chopsticks for handling
- Spray bottle (ideally distilled or rainwater)
- Long-handled tweezers
- Small brush to clean the inside of the glass
The layers: the secret of a long-lasting terrarium
This is the most technical step. Mess up the layers and your terrarium will rot within three months.
Layer 1: drainage (3-4 cm)
At the bottom of the jar, lay down 3 to 4 cm of fine gravel or expanded clay pebbles. This layer creates a water reserve at the bottom, out of reach of roots. It’s what prevents root suffocation in case of excess watering.
Layer 2: activated charcoal (1 cm)
Sprinkle 1 cm of activated charcoal over the drainage. Its role: filter bacteria, neutralise decomposition odours, prevent mould. A terrarium without charcoal survives, but it smells bad within a few months.
Layer 3: geotextile (1 mm)
Cut a disc of geotextile to the jar’s size, lay it over the charcoal. It prevents substrate from falling into the drainage. If you don’t have any, a layer of dry sphagnum moss works.
Layer 4: substrate (4-8 cm)
Pour 4 to 8 cm of substrate depending on jar size. Ideal mix:
- 60% tropical plant potting soil
- 20% coco coir or peat moss
- 20% fine perlite
Before planting, lightly moisten the substrate with a spray — never soggy.
Layer 5: decor and planting
Build the landscape: raised stones, vertical bark pieces, mini substrate hills. Plant your specimens from largest to smallest, starting from the back of the jar. Gently firm around the roots. Finish by dressing the remaining ground with live moss (foraged sheet moss or moss from a specialist nursery).
Suitable plants: what works, what doesn’t
Not every plant tolerates the saturated humidity of a closed terrarium. Here are the champions.
The safe bets
- Fittonia (Fittonia verschaffeltii) — the queen of terrariums, leaves veined with pink, white or red, loves 100% humidity
- Pilea (Pilea cadierei, Pilea involucrata) — small, compact, handles humidity perfectly. The classic Pilea peperomioides is usually too large for most terrariums; go for its miniature cousins
- Mini ferns — Asplenium nidus ‘crispum’, Selaginella, Microsorum diversifolium. They thrive in humid air
- Soleirolia soleirolii (baby tears) — flat green carpet that covers the soil like a Japanese lawn
- Ficus pumila — small climber that scales bark and glass
- Hypoestes phyllostachya (polka dot plant) — leaves spotted pink or white, grows fast
For added character
- Live moss (Hypnum, Polytrichum) — visually essential
- Small Cryptanthus (earth stars) — colourful, compact bromeliads
- Anubias nana (aquarium plant) — works above water, very slow
- Pellionia — variegated bronze-green foliage, creeping growth
What to avoid
- All succulents and cacti: will rot within weeks
- Desert plants like Sansevieria, Crassula, Aloe
- Fast-growing plants like Pothos, Philodendron: will overrun the jar in six months
- Plants too large: Calathea, Monstera, Alocasia
- Hairy-leaved plants: African violets (Saintpaulia), Episcia — mould develops on the hairs
Step-by-step tutorial
Step 1 — Sterilise
Wash the jar in hot soapy water, rinse thoroughly, dry completely. If reusing an old container, disinfect with diluted bleach, then rinse several times.
Step 2 — Build the layers
Work in order: drainage → charcoal → geotextile → substrate. Press each layer lightly.
Step 3 — Create relief
With a spoon, sculpt the soil: dig at the front for depth, build a small hill at the back. Place your decorative elements (bark, stones).
Step 4 — Plant
Unpot each plant, gently shake the roots to lose 30% of the original root ball. Dig a hole with the spoon, insert the plant, firm around the roots. Plant largest to smallest, from back to front.
Step 5 — Cover with moss
Cut moss into pieces, press it against the remaining soil so it adheres. The moss must touch the substrate (otherwise it dries out).
Step 6 — Initial watering
Spray generously — around 30 to 50 spritzes for a 3-litre jar. The substrate should be moist, not soaked. If you see water pooling in the drainage, it’s too much.
Step 7 — Seal and observe
Close the lid. For the first 48 hours, watch. You’ll see condensation appear on the walls — normal and a good sign.
Care: non-intervention as a principle
A well-balanced closed terrarium requires almost zero maintenance. That’s its whole charm.
Light
Place the terrarium in bright indirect light — never full sun. Direct sun would turn the jar into a scorching greenhouse (magnifying lens effect on the glass), killing plants in a few hours. An east or west window, or 1-2 metres from a south window behind a sheer curtain, is ideal. Our complete light guide explains how to measure each spot’s light.
Watering: near zero
After the initial watering, you’ll probably never water again, or very rarely. The internal water cycle is enough.
Check monthly:
- Condensation on the walls in the morning: perfect balance
- No condensation, dry substrate: needs water, give it 5-10 spritzes
- Permanent fog blocking the view of plants: too much humidity, open the lid for 24-48 hours
Occasional ventilation
If condensation is constantly excessive (the glass is completely opaque), open the lid for 1 to 2 days to let air circulate. Then reseal. This is rare — every 3 to 6 months at most.
Pruning
If a plant takes over and touches the lid, prune it with tweezers. Never let a plant constantly touch the glass: condensation will eventually rot it.
Common mistakes and solutions
- White mould on the soil: excess humidity or decomposing organic matter. Open the lid for 1-2 days, remove affected zones with a cotton bud
- Plants yellowing and melting: too much initial water. Open for 3-4 days to dry, remove dead plants
- Glass completely opaque, no visibility: too much humidity. Open for 1-2 days
- Moss turning brown: lack of light or hard tap water. Move closer to a window, use only rainwater or distilled water
- Small “worms” or springtails appearing: these are beneficial natural decomposers. They break down dead matter. Don’t remove them!
- Fungus gnats appearing: eggs were present in the original substrate. Place a small yellow sticky trap inside for 2 weeks
For an ultra-stable, clean substrate, some terrarists use a mineral substrate like pon — not mandatory but worth experimenting with.
Display ideas
- “Enchanted forest” terrarium: moss + mini fern + vertical bark + 1 mini animal figurine
- “Japanese valley” terrarium: baby tears carpet + 1 moss-covered stone + 1 mini bonsai like Ficus pumila
- “Tropical jungle” terrarium: fittonia + Pilea + Selaginella + driftwood
- “Green desert” terrarium (no succulents): Cryptanthus + moss + white pebbles + light bark
To ease into it, start with a single 1-2 litre jar and three plants maximum. You’ll get the hang of it quickly. Our roundup of the best easy plants for beginners can help you pick species.
Frequently asked questions
The most common questions about closed terrariums.
- Ideally: never, after the initial watering, or very rarely. If condensation disappears completely and the substrate looks dry, spray 5 to 10 times with rainwater or distilled water. A well-balanced terrarium can live for years without further watering.
- No, absolutely not. Succulents and cacti need a dry environment between waterings. The saturated humidity of a closed terrarium will rot their roots and tissues within weeks. For succulents, go with an open terrarium (no lid) — it's a radically different format.
- Theoretically, indefinitely. David Latimer's terrarium has lived since 1960 (with a single watering in 1972). In practice, expect 5 to 10 years before a major intervention is needed (pruning, replacing a plant). The limiting factor is often the excessive growth of certain plants that end up dominating the jar.
- It can be long-term. Mild morning fog that clears during the day is normal and a sign of balance. Permanent opacity signals too much humidity. Open the lid for 24 to 48 hours to let air circulate, then reseal. Also check no plant is permanently touching the glass.
- Open the lid immediately for 1 to 2 days to dry out. Remove mouldy zones with a cotton bud dipped in diluted hydrogen peroxide. Check no dead leaf is rotting. Mould indicates excess humidity or decomposing organic matter — rare when activated charcoal and drainage are properly sized.